Why neat? A string poorly wound onto the tuning peg can shift, cause undue wear, bind or break. Needless to say it can make tuning difficult and damage the tuning mechanism. I'll show you what not to do and tell you why. The same goes for the correct way -- mine anyway. There are other ways to do it right than the way I do.
First, the wrong way. In the image at right, the string is wound much too high on the peg. It will likely slip down the peg and go out of tune. But worse than that, the increased leverage will eventually cause the peg to bind -- damaging the mechanism.
Here the string is wound much too low. The same tuning problem will occur, but a different kind of binding. If enough string is wound to reach the bezel, it will cause excessive outward force on the peg.
This is a bird's nest. The string should never cross over itself. It will likely slip, and if it falls off a previous winding while you are playing...
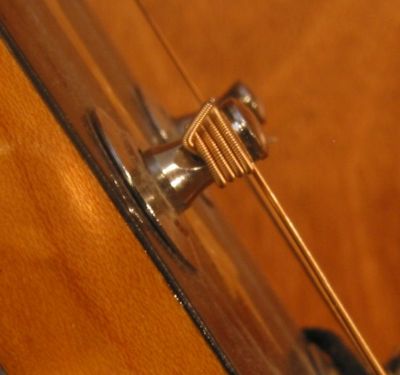
This is more like it. If the string wraps off of the middle of the peg -- where it's smaller in diameter -- the gears have more leverage, reducing wear and making tuning easier. 2 to 3 turns should be enough to prevent slipping. More turns for thinner strings, fewer for thicker strings. I have been doing it this way for decades and have never had a slippage problem. The trick is to pinch the "tail" between the first two turns. Knots are unnecessary and difficult to untie. The images below are of the same peg from opposite sides.
You will need wire cutters, an inexpensive winder (optional but recommended) and of course a new set of strings. Next, a way of safely holding the instrument that leaves both hands free. A bed, couch or padded chair will do, but they aren't very secure. I use a guitar stand and hold the instrument with my knees. This method also works without the stand.
Only change one string at a time! Not only will this prevent you from mixing things up, like stringing to the wrong tuning peg, but a stringed instrument -- especially one made of wood -- should spend its entire life strung and tuned. Without the tension of the strings, the wood will warp and joints will fail. Worse is the idea that loosening all the strings when the instrument is not in use will extend the life of the strings. It will not! The repeated stretching and release will shorten the life of the strings and eventually ruin the instrument.
Don't bend the strings more than you have to -- especially the wound ones. When a wound string bends its core stretches. If the bend isn't too sharp it will spring back, if it is it won't. A good rule of thumb is to not bend the string tighter than it was when you first removed it from its package.

After a string is loosened it's time to remove its bridge pin.
This shouldn't take much effort. If it does, something's wrong. The problem could be a damaged pin, a badly worn hole or a poor install -- the pin groove turned the wrong way, the string partially wrapped around the pin or both. But more than likely it's because excessive force was used. A firm push with your thumb is all that is necessary. The friction of the pin in the hole is not what holds it in place. When the string is pulled, the ball on the end will jamb the pin.
If the pin pops back out when the string is pulled, then the ball hadn't "fallen off" the end of the pin. Rotate the string slightly and try again. If the pin falls out when the string is fully tightened -- and the string doesn't come loose -- it might be time to see how far the string has cut its way through the bridge. My guitar has this problem -- something on my list of things to fix.
Now for the fun part. After you have inserted the appropriate ball end, pushed in the pin and pulled the string tight, it's time to start winding. Rotate the tuning peg until its hole is perpendicular to the neck and pushed the "tail" of the string through.
Now, there is a shortcut that should never be taken. It is possible and tempting to take the string in your fingers and wrap it around the peg a few times as you would wrap excess thread back onto a spool. This will just cause one of the aforementioned problems and worse -- it will twist the string.
Gently pull the "tail" with one hand and hold the center of the string about 4 inches above the fret board (at about the twelfth to fourteenth fret) with the other.
When the string starts to bend at the peg, hold the "tail" in place and bend the string at a neat 90° angle.
Start winding while keeping some tension on the string -- just enough to cause the string to wrap around the peg. Note in the image at right, the "tail" is passing under the string. Once it clears, bend it straight up and continue winding but make sure the string starts to wrap downward -- I often have to push down on the string to make sure it goes below the first turn.
Just before the string is fully tightened, move it to one side.
Use a pencil (I prefer the cheap mechanical ones) to color in the groove. Graphite is an excellent dry lubricant.
Return the string to its groove and tune.
Cut the "tail."
Finished!
 |
|||
 |
 |
 |
 |
 |
 |
 |